DIY projects

Make old new again with these inspiring interior projects

The Resene Eden Wallpaper Collection M37311 is perfectly balanced with the crisp Resene SpaceCote Low Sheen in Resene Black White used on the custom-made wainscoting.

Transform your home’s dated furnishings into stylish features with a little inspiration, clever craftsmanship and of course, Resene paint. While houses built in previous decades often come with plenty of character, if they aren’t maintained properly they can start to look more drab than fab. You can also add classic character features that weren’t previously there to evoke a different ambiance or theme to your rooms or create a completely different look with textured paint and a new colour. 

These changes are far more cost effective than replacing or removing old furniture, and with patience and planning they can be undertaken by DIYers of every skill level. Below are three ideas you can get stuck into at your place over a weekend or two – you won’t believe the difference.

Top tip: It’s easy to make old things look new again with fresh wood stains, paint or wallpaper. Take a photo of any areas or furniture in your home that need refreshing into your local Resene ColorShop and the team can talk you through options to get them looking as good as new.  Or use the online Ask a Resene Paint Expert service.
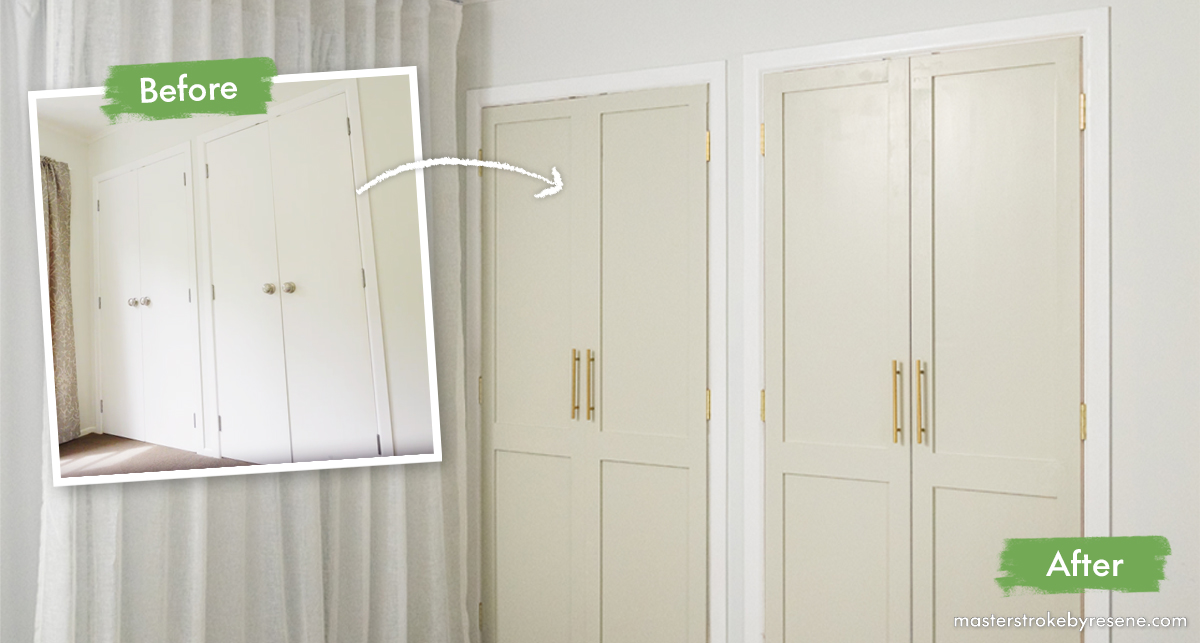
Shaker doors

Take your old wardrobe doors from boring to beautiful with a little DIY. For the design-savvy among us, shaker-style doors have been a long-time inspiration, thanks to their crisp lines and subtle craftsmanship. All it takes is a few carefully placed timber panels to transform a simple timber door into a statement piece and functional work of art. 

There are a few parts to the process here, which will guarantee success if done correctly and in the right order. First is removing the doors from their hinges and undertaking the required prep outside, then cutting the mouldings to size, securing them and finally repainting the doors. We’ve enhanced ours even further with some new gold hinges and handles and a fresh coat of Resene Enamacryl in Resene Half Tana, a stylish dawn grey.

Top tip: Instead of cutting your own mouldings to size, which can be a time-consuming part of the process, buy them pre-cut from your local timber supplier

Check out our step-by-step instructions here to make your own.

Doors painted in Resene Enamacryl in Resene Half Tana and architraves in Resene Lustacryl in Resene White.

Custom wainscoting

A fantastic way to add striking detailing that really elevates a room is to install handmade wainscoting. This type of panelling is found in many classic American homes, like the iconic houses in movies like Father of the Bride and Home Alone. Often found on the lower part of walls, it’s created by cutting box trim to size and attaching it to the wall to create a timeless feature. While the process can be a little time consuming, the effect is well worth it.  

Start by marking out squares or rectangles on the wall with pencil, then cut raw timber at 45-degree angles before gluing it onto the wall piece by piece with adhesive. Then prime your wainscoting before painting in your favourite Resene colour.

Top tip: When priming wainscoting, use Resene Quick Dry waterborne primer undercoat as it is new timber. For any other wooden surfaces that are already varnished, use Resene Waterborne Sureseal pigmented sealer.

See how Demo to Reno couple Tyge and Christina added custom wainscoting to their dining room, pool room and son’s bedroom.

Walls painted in Resene SpaceCote Low Sheen in Resene Black White, wainscoting in Resene Zylone Sheen in Resene Bunting and trims in Resene Lustacryl in Resene Black White.

Textured paint

Revitalise your dated fireplace tiles with a splash of paint in an on-trend hue. Using Resene Sandtex Mediterranean effect on your tiles results in an authentic, textured finish, bringing out the depth of your chosen colour and turning your fireplace into a true statement piece. This product provides a tough textured acrylic finish that beautifies and protects your surface. It has the ability to recreate the texture of natural sandstone.

For this project, we chose the colour Resene Cabbage Pont – it’s a muted, shadowy green, that works beautifully in both character and contemporary homes. It’s also a refreshing and bold step up from the ‘safe’ whites that many people tend to use in their homes. 

Tiles need special treatment before painting, but Resene has you covered with the essential prep. Sand first, prime with Resene Waterborne Sureseal pigmented sealer, apply Resene Sandtex and then follow with your topcoat. 

Top tip: When you’re painting around a fireplace or on something like a heater, make sure it doesn’t get too hot first. There’s an easy way to check – if you can keep your hand on the fire surround while the fire is lit, you can paint the surround. If it’s too hot, you can’t.

Tiles and hearth painted in Resene Sandtex Mediterranean effect and Resene SpaceCote Low Sheen in Resene Cabbage Pont, walls and hearth in Resene SpaceCote Low Sheen in Resene Cabbage Pont, mantelpiece in Resene Colorwood Whitewash and Resene Aquaclear, vases in Resene Lumbersider Low Sheen in Resene Quarter Parchment, Resene Biscotti and Resene Alabaster and picture frame in Resene SpaceCote Low Sheen in Resene Half Black White.

How much paint will you need?

If you change data entered into the fields below, ensure you press the calculate button again to re-run the equations and get the new answers.
Calculated result: 0 Litres in total
To find the spreading rate of your Resene product, click here.
NB: Porous surfaces and shapes (ie corrugated iron) will require more paint.

About MasterStroke by Resene
MasterStroke by Resene is here to help you master your paint and decorating DIY projects. Brush up on your skills with advice, tips and ideas from our trusted experts.

Check out the latest how-to videos on our YouTube channel.